因为工作与学习的缘故,总是需要浏览全球文献,但是由于我有时的地理位置并不支持我自由地穿梭在全球互联网上。而且我的服务器总是容易被封锁端口,于是我就参考官方和第三方文档搭建了一个服务器,并且稳定半年使用都没有问题。
于是,我决定打开一个教程,用于自己的温习和记录。
前置条件
首先我们需要【一台】线路不错的【服务器】,起码在受限制的地区连接不会很慢。(延迟并不能代表一切)
其次,我们需要【一个域名】
我使用的一台香港的服务器,因为香港作为一个发达的网络数据处理中心,在很多地方连接都不会很慢(起码对我来说)。
解析域名
我们需要解析一个【A记录】给服务器,请勿开启CDN。
安装Xray & 所需软件
因为V2ray内部团队的问题,Xray从V2ray分家出来,Xray更像是V2ray的超集,完全支援V2ray。我们不过多探讨这些内容,总之就是,Xray的历史原因,使得其并不包含在deb官方仓库中(我使用的是Debian),所以我们使用Xray官方提供的安装脚本来安装Xray:
从官方脚本 安装Xray
bash -c "$(curl -L https://github.com/XTLS/Xray-install/raw/main/install-release.sh)" @ install
安装Nginx和证书申请工具
apt install nginx python3-certbot python3-certbot-nginx
生成Xray所需的UUID
xray uuid

# 之后大概会得到类似下面的内容
# 3c0841a0-0017-4282-bd7f-afa72c006a3f
生成Reality所需的密钥
xray x25519

# 之后大概会得到类似下面的内容
# Private key: SJcCdG*******o2TPC_CTzz*****EcU0
# Public key: RiM_pehn*******aTQ-xMBR*****B9Qk
开始配置 Xray 的 Config 文件
mkdir -p /usr/xray/xray_log/
vim /usr/local/etc/xray/config.json
可以参考并替换成我的配置:(【需要修改】的已经用【六】个【/】来标出)
{
  "log": {
    "loglevel": "warning",
    "access": "/usr/xray/xray_log/access.log",
    "error": "/usr/xray/xray_log/error.log"
  },
  "dns": {
    "servers": [
      "https+local://1.1.1.1/dns-query",        // 首选 1.1.1.1 的 DoH 查询,牺牲速度但可防止 ISP 偷窥
      "localhost"
    ]
  },
  "routing": {
    "domainStrategy": "IPIfNonMatch",
    "rules": [
      {
        // 防止服务器本地流转问题:如内网被攻击或滥用、错误的本地回环等
        "type": "field",
        "ip": [
          "geoip:private"
        ],
        "outboundTag": "block"
      },
      {
        "type": "field",
        "ip": ["geoip:cn"],
        "outboundTag": "block"      // 这里对中国大陆的访问做了抛弃处理,所以开了全局模式,让所有流量走到服务器,发现访问的是中国大陆网站时,Xray会做抛弃处理,不返回任何数据。
         // 流量直连(direct)
         // 流量转发 VPS(proxy)
         // 流量屏蔽(block)
      },
        // 屏蔽广告
      {
        "type": "field",
        "domain": [
          "geosite:category-ads-all"
        ],
        "outboundTag": "block"
      }
    ]
  },
    // 入站设置(如若多个inbounds,则可以单服务器多协议,或者多节点)
  "inbounds": [
    {
      "port": 443,
      "protocol": "vless",
      "settings": {
        "clients": [
          {
            "id": "3c0841a0-0017-4282-bd7f-afa72c006a3f",       ////// 填入生成的UUID
            "flow": "xtls-rprx-vision",
            "level": 0,
            "email": "[email protected]"       ////// 电邮地址(随便)
          }
        ],
        "decryption": "none",
        "fallbacks": [
          {
            "dest": 80          // 默认回落到防探测的代理
          }
        ]
      },
      "streamSettings": {
        "network": "tcp",
        "security": "reality",
        "realitySettings": {
                "show": false,
                "dest": "xxxx.com:8909",            ////// (解析的域名:Nginx配置的端口)。不知道端口是什么请往后看
                "xver": 0,
                "serverNames": [
                        "xxxx.com"      ////// 上面写的域名
                    ],
                "privateKey": "SJcCdG*******o2TPC_CTzz*****EcU0",       ////// 上面生成的x25519私钥
                "maxTimeDiff": 0,
                "shortIds": [
                        "abc123"        ////// 0 到 f,长度为 2 的倍数,长度上限为 16
                    ]
        }
      }
    }
  ],
    // 出站设置
  "outbounds": [
    {
        // 默认规则,freedom 就是对外直连(VPS 已经是外网,所以直连)
      "tag": "direct",
      "protocol": "freedom"
    },
    {
        // 屏蔽规则,blackhole 协议就是把流量导入到黑洞里(屏蔽)
      "tag": "block",
      "protocol": "blackhole"
    }
  ]
}
配置完毕上面的json文件后。
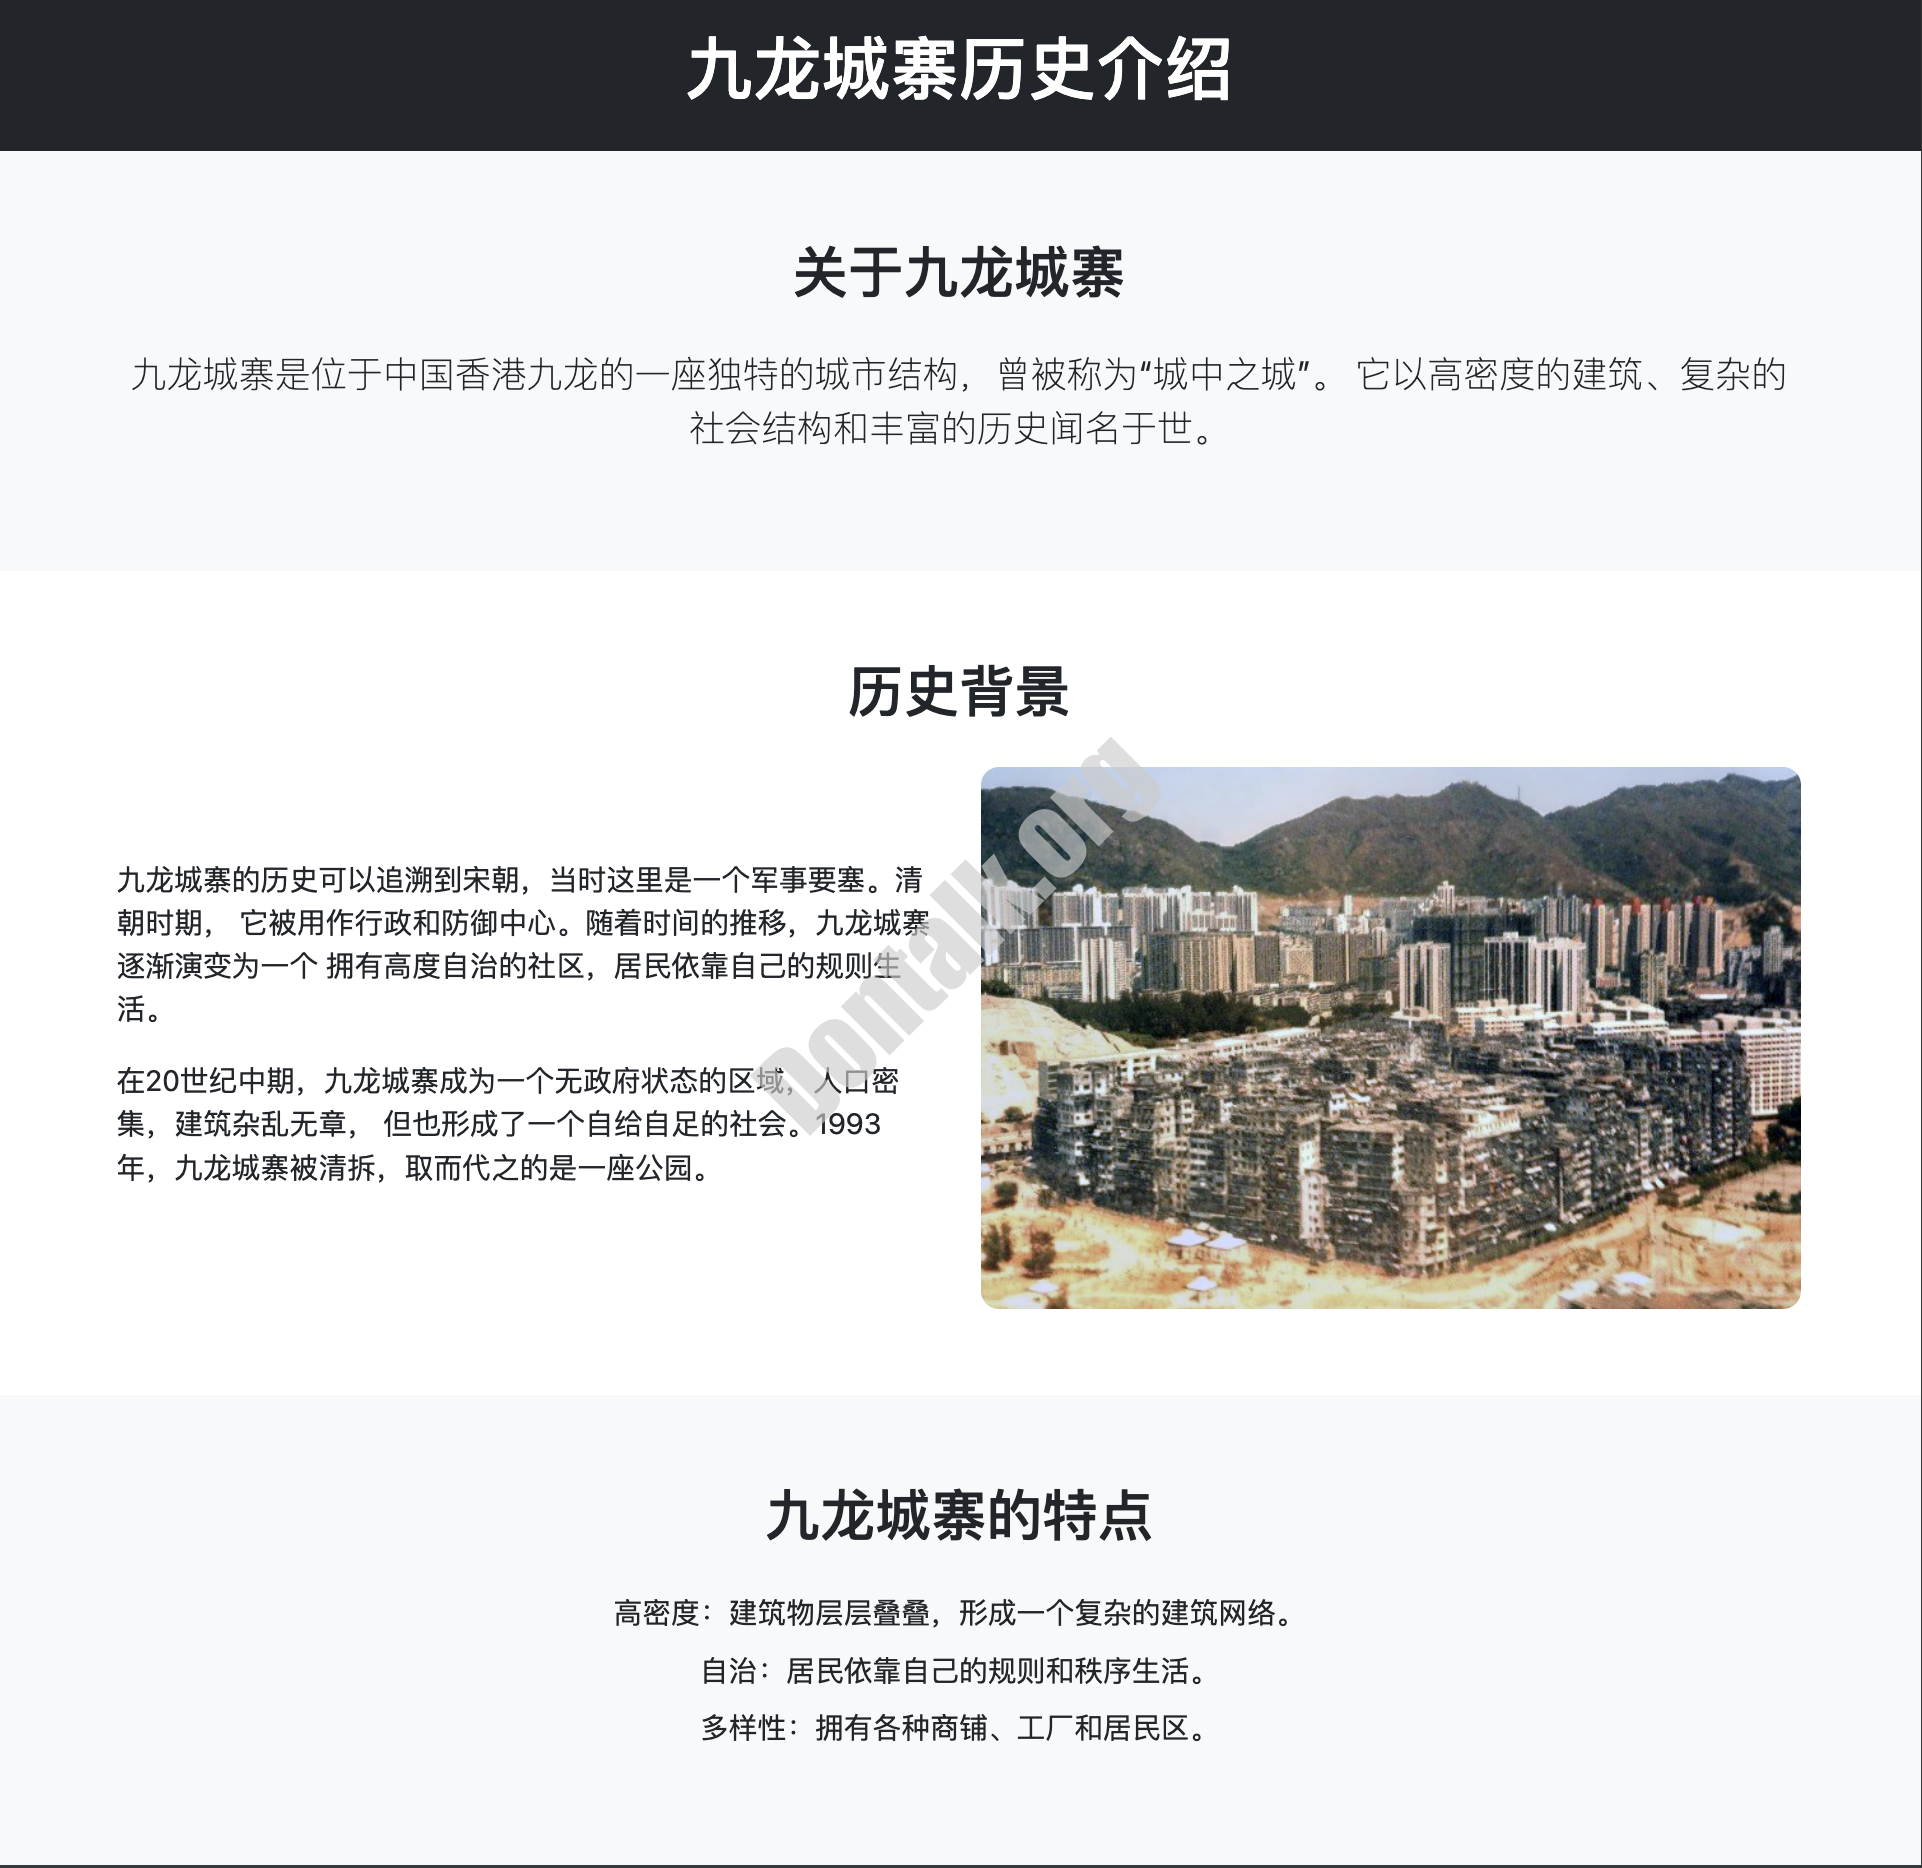
写一个 HTML 静态网站。
把下面内容写入到 /var/www/hk/index.html
<!DOCTYPE html>
<html lang="zh-CN">
<head>
    <meta charset="UTF-8">
    <meta name="viewport" content="width=device-width, initial-scale=1.0">
    <title>九龙城寨历史介绍</title>
    <link href="https://cdn.jsdelivr.net/npm/[email protected]/dist/css/bootstrap.min.css" rel="stylesheet">
    <style>
        .intro-section {
            background-color: #f8f9fa;
            padding: 3rem 1rem;
        }
        .history-section {
            padding: 3rem 1rem;
        }
        .image-section img {
            max-width: 100%;
            border-radius: 10px;
        }
        .footer {
            background-color: #343a40;
            color: white;
            padding: 1rem 0;
            text-align: center;
        }
    </style>
</head>
<body>
    <header class="bg-dark text-white py-3">
        <div class="container">
            <h1 class="text-center">九龙城寨历史介绍</h1>
        </div>
    </header>

    <section class="intro-section text-center">
        <div class="container">
            <h2 class="mb-4">关于九龙城寨</h2>
            <p class="lead">
                九龙城寨是位于中国香港九龙的一座独特的城市结构,曾被称为“城中之城”。
                它以高密度的建筑、复杂的社会结构和丰富的历史闻名于世。
            </p>
        </div>
    </section>

    <section class="history-section">
        <div class="container">
            <h2 class="text-center mb-4">历史背景</h2>
            <div class="row align-items-center">
                <div class="col-lg-6">
                    <p>
                        九龙城寨的历史可以追溯到宋朝,当时这里是一个军事要塞。清朝时期,
                        它被用作行政和防御中心。随着时间的推移,九龙城寨逐渐演变为一个
                        拥有高度自治的社区,居民依靠自己的规则生活。
                    </p>
                    <p>
                        在20世纪中期,九龙城寨成为一个无政府状态的区域,人口密集,建筑杂乱无章,
                        但也形成了一个自给自足的社会。1993年,九龙城寨被清拆,取而代之的是一座公园。
                    </p>
                </div>
                <div class="col-lg-6 image-section">
                    <img src="https://upload.wikimedia.org/wikipedia/commons/3/3a/Kowloon_Walled_City.jpg" alt="九龙城寨历史图片">
                </div>
            </div>
        </div>
    </section>

    <section class="intro-section text-center">
        <div class="container">
            <h2 class="mb-4">九龙城寨的特点</h2>
            <ul class="list-unstyled">
                <li class="mb-2">高密度:建筑物层层叠叠,形成一个复杂的建筑网络。</li>
                <li class="mb-2">自治:居民依靠自己的规则和秩序生活。</li>
                <li class="mb-2">多样性:拥有各种商铺、工厂和居民区。</li>
            </ul>
        </div>
    </section>

    <footer class="footer">
        <div class="container">
            <p>© 2025 九龙城寨历史介绍 | 由 Bootstrap 5 构建</p>
        </div>
    </footer>

    <script src="https://cdn.jsdelivr.net/npm/[email protected]/dist/js/bootstrap.bundle.min.js"></script>
</body>
</html>
效果大概如下:
写一段Nginx配置,并申请证书
把下面配置写入 /etc/nginx/conf.d/hk.conf
server {
    listen 80;
    server_name xxxx.com;       # 你解析的域名

    root /var/www/hk;             # 刚刚 index.html 存放的目录
    index index.html;
}
保存完毕上面的内容后
用下面命令查看Nginx配置语法是否有错
nginx -t
# 输出下面的内容则表明没问题
nginx: the configuration file /etc/nginx/nginx.conf syntax is ok
nginx: configuration file /etc/nginx/nginx.conf test is successful
使用下面的内容重载Nginx和申请证书
# 重载Nginx
nginx -s reload
# 申请证书
certbot --nginx
之后我们再次打开nginx的配置文件,大概就是这样了,我们进行一些修改
server {
    listen 80;
    server_name xxxx.com;      # 你解析的域名

    root /var/www/hk;           # 刚刚 index.html 存放的目录
    index index.html;

    listen 443 ssl; # managed by Certbot
    ssl_certificate /etc/letsencrypt/live/xxxx.com/fullchain.pem; # managed by Certbot
    ssl_certificate_key /etc/letsencrypt/live/xxxx.com/privkey.pem; # managed by Certbot
    include /etc/letsencrypt/options-ssl-nginx.conf; # managed by Certbot
    ssl_dhparam /etc/letsencrypt/ssl-dhparams.pem; # managed by Certbot
}
修改后:
server {
    listen 8909 ssl http2;          # 还记得吗,这里对应了Xray配置文件的端口
    server_name xxxx.com;      # 你解析的域名

    root /var/www/hk;           # 刚刚 index.html 存放的目录
    index index.html;

    ssl_protocols TLSv1.2 TLSv1.3;      ### 很重要!因为Reality只支持TLS1.3,如果不填写这项配置,节点将无效。因为Nginx默认使用TLSv1.1。强制使用TLSv1.2 TLSv1.3。

    # listen 443 ssl; # managed by Certbot 注释或者删掉。下面证书申请到的地址和你的域名相关
    ssl_certificate /etc/letsencrypt/live/xxxx.com/fullchain.pem; # managed by Certbot
    ssl_certificate_key /etc/letsencrypt/live/xxxx.com/privkey.pem; # managed by Certbot
    # include /etc/letsencrypt/options-ssl-nginx.conf; # managed by Certbot
    ssl_dhparam /etc/letsencrypt/ssl-dhparams.pem; # managed by Certbot
}
修改完成,保存,之后继续看看nginx配置有没有问题,没问题就重载一下nginx
如果你之后又修改了Nginx配置文件,请记得重载Nginx。
打开网站,右键检查,找到安全的标签页,就能看到网站走的是TLSv几了
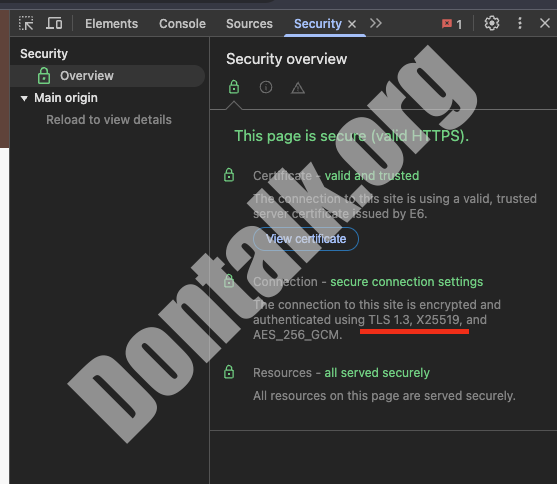
新版Chrome合并后,这个页面叫:Privacy and Security。打开后在Security页查看。
(第一次)启动 Xray
systemctl enable --now xray

# Xray不会报错的(即便无法运行)所以要用下面命令看看有没有启动成功。
systemctl status xray
(手动安装的)Xray启动失败除了很明显写了你的配置文件有问题之外,就剩下权限问题了。一般来说,Xray的权限是Everyone,是很低很低的,所以你的xray必须放在/usr这个目录下,权限才会足够。(/usr/local/bin/xray)。或者你可以修改Xray的权限和归属组,但是我认为太麻烦了。
完成后,重启Xray: systemctl restart xray
这个时候应该就没问题了: systemctl status xray
不过,目前xray除了手动安装外,安装脚本会把你的xray放在 /usr/local/bin/xray 下,所以不必担心。
Xray报错 – 疑难杂症
目录权限不够
我们的xray日志目录会不够权限,从而报错:
Mar 20 07:08:47 C20240928005482 xray[387022]: Failed to start: main: failed to create server > app/log: failed to initialize access logger > open /usr/xray/xray_log/access.log: permission denied
我们这样给一下权限就行:
# 未给权限时的目录
#drwxr-xr-x  2 root root 4096 Mar 20 07:11 xray_log

chown -R nobody:nogroup /usr/xray/xray_log/

# 给了权限后的目录
#drwxr-xr-x  2 nobody nogroup 4096 Mar 20 07:11 xray_log
之后重启xray systemctl restart xray ,目录会生成log文件,但是依旧会报错,因为log没有写入权限。
我们给一下 log文件 一下755权限:
# 未给权限时的文件
#-rw------- 1 nobody nogroup    0 Mar 20 07:12 access.log
#-rw------- 1 nobody nogroup    0 Mar 20 07:12 error.log

chmod -R 755 /usr/xray/xray_log/

# 给了权限后的文件
#-rwxr-xr-x 1 nobody nogroup    0 Mar 20 07:12 access.log
#-rwxr-xr-x 1 nobody nogroup    0 Mar 20 07:12 error.log
Nginx 443端口占用问题
xray.service: Start request repeated too quickly.
报错xray.service: Start request repeated too quickly.:
Mar 20 07:13:00 C20240928005482 systemd[1]: xray.service: Main process exited, code=exited, status=255/EXCEPTION
Mar 20 07:13:00 C20240928005482 systemd[1]: xray.service: Failed with result 'exit-code'.
Mar 20 07:13:01 C20240928005482 systemd[1]: xray.service: Scheduled restart job, restart counter is at 5.
Mar 20 07:13:01 C20240928005482 systemd[1]: Stopped Xray Service.
Mar 20 07:13:01 C20240928005482 systemd[1]: xray.service: Start request repeated too quickly.
Mar 20 07:13:01 C20240928005482 systemd[1]: xray.service: Failed with result 'exit-code'.
Mar 20 07:13:01 C20240928005482 systemd[1]: Failed to start Xray Service.
上面没有特别有用的信息,所以我们用 journalctl -u xray 命令看一下怎么样了,可以看到一条:
Failed to start: app/proxyman/inbound: failed to listen TCP on 443 > transport/internet: failed to listen on address: 0.0.0.0:443 > transport/internet/tcp: failed to listen TCP on 0.0.0.0:443 > listen tcp 0.0.0.0:443: bind: address already in use
明显是443端口占用问题。明显是Nginx刚刚配置文件顶号了,Nginx配置文件顶号了,自行修改Xray配置文件,或者Nginx配置。因为服务器配置好,不是只是节点服务器,服务器这里有一个Web实例正在运行,所以不好改Nginx配置文件,我只好更改Xray配置文件。
在配置文件39行处,反正就是全文,有且只有一个443,就在39行(我的是)。 所以我需要更改这个443,防止其和Nginx冲突,但是只是因为我艺高人胆大(目移),如果害怕服务器被封锁,我还是建议更改Nginx配置文件吧(嗯)。
改完后重启xray,之后把下面客户端配置内的端口换成你改完的端口就行。比如说我把Xray配置文件的443改成了9901,那我就把客户端输入的443换成了9901。没啥问题,正常可用。
记得重新启动xray
systemctl restart xray
节点有延迟,但不正常工作 – (包括发现网页打不开,没有发送任何数据)
如果网页正常打开,你看看是不是客户端 ShortId 没填对,填错的话就会出现无法连接节点的问题,但是节点会有延迟。
如果是网页也打不开的话:检查 nginx 网页配置文件里面的端口配置,比如说上文提到的 8909,如果你的 nginx 配置端口和 xray 配置文件的回落端口不一致(上文是8909),就会导致节点有延迟,但是打不开网页的问题。当然,如果你不单单配置错端口,连域名也搞错了,那就绝对不可能打开网页了。
因为原理是:Xray 监听 443 端口,将合法的伪装流量(节点流量)直接转发,而将所有非合法的伪装流量(普通浏览器访问)通过 fallbacks 规则转发给 Nginx 来提供正常的网页服务。如果 Nginx 配置(无法和xray配置文件端口对上)或运行有问题,网页就会无法显示(没有发送任何数据)。
正常运行(成功启动 Xray)
下面是正常运行的状态:
● xray.service - Xray Service
     Loaded: loaded (/etc/systemd/system/xray.service; enabled; vendor preset: enabled)
    Drop-In: /etc/systemd/system/xray.service.d
             └─10-donot_touch_single_conf.conf
     Active: active (running) since Thu 2025-03-20 05:59:09 UTC; 52min ago
       Docs: https://github.com/xtls
   Main PID: 385334 (xray)
      Tasks: 6 (limit: 2339)
     Memory: 3.8M
     CGroup: /system.slice/xray.service
             └─385334 /usr/local/bin/xray run -config /usr/local/etc/xray/config.json

Mar 20 05:59:09 C20240928005482 systemd[1]: Started Xray Service.
Mar 20 05:59:09 C20240928005482 xray[385334]: Xray 25.3.6 (Xray, Penetrates Everything.) 2cba2c4 (go1.24.1 linux/amd64)
Mar 20 05:59:09 C20240928005482 xray[385334]: A unified platform for anti-censorship.
Mar 20 05:59:09 C20240928005482 xray[385334]: 2025/03/20 05:59:09.657653 [Info] infra/conf/serial: Reading config: &{Name:/usr/local/etc/xray/config.json Format:json}
Mar 20 05:59:09 C20240928005482 xray[385334]: 2025/03/20 05:59:09.703632 [Warning] core: Xray 25.3.6 started
客户端连接配置
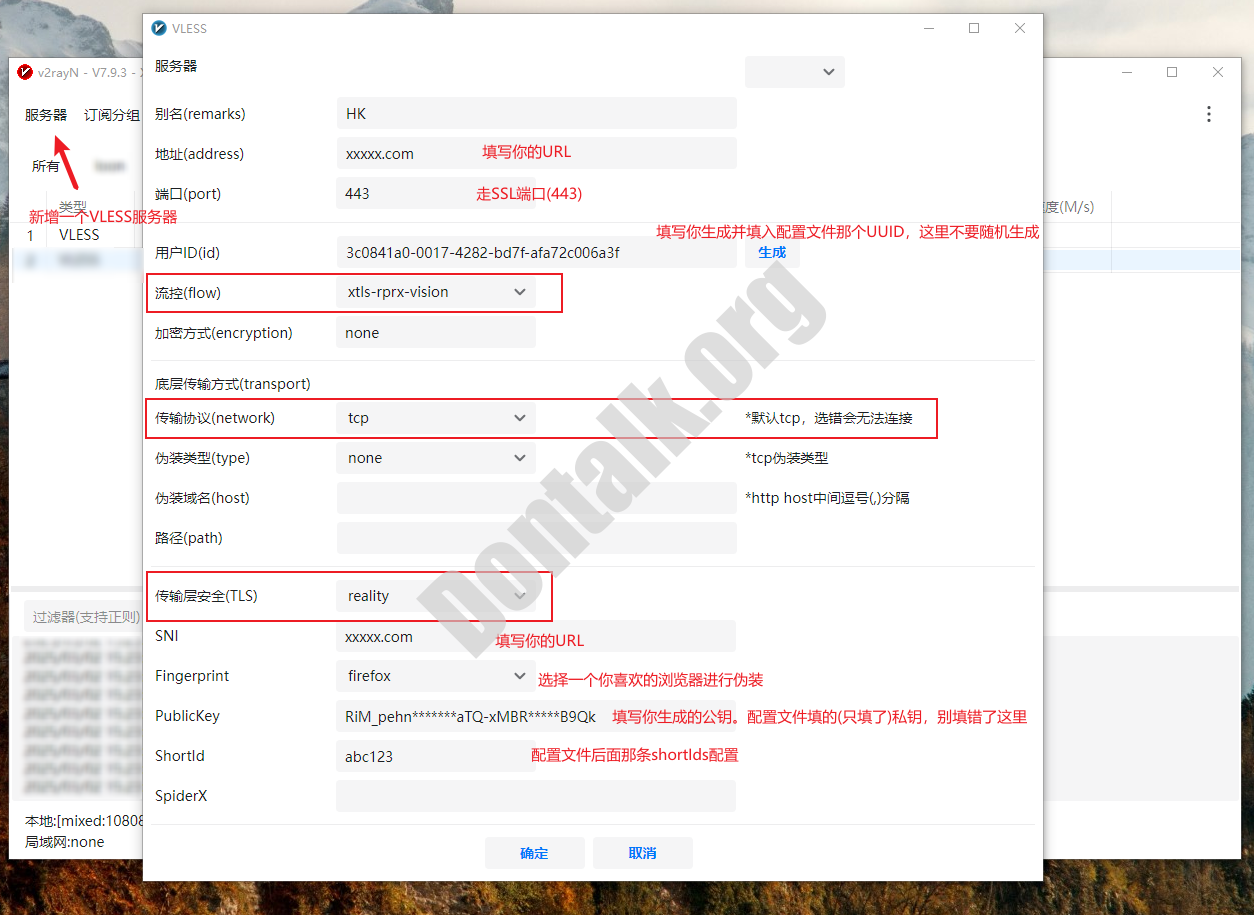
如果上面更改了443端口(Nginx顶号了),这里的443按照你Xray配置更改的端口,写上去就好。
(Windows、安卓)V2rayN配置:
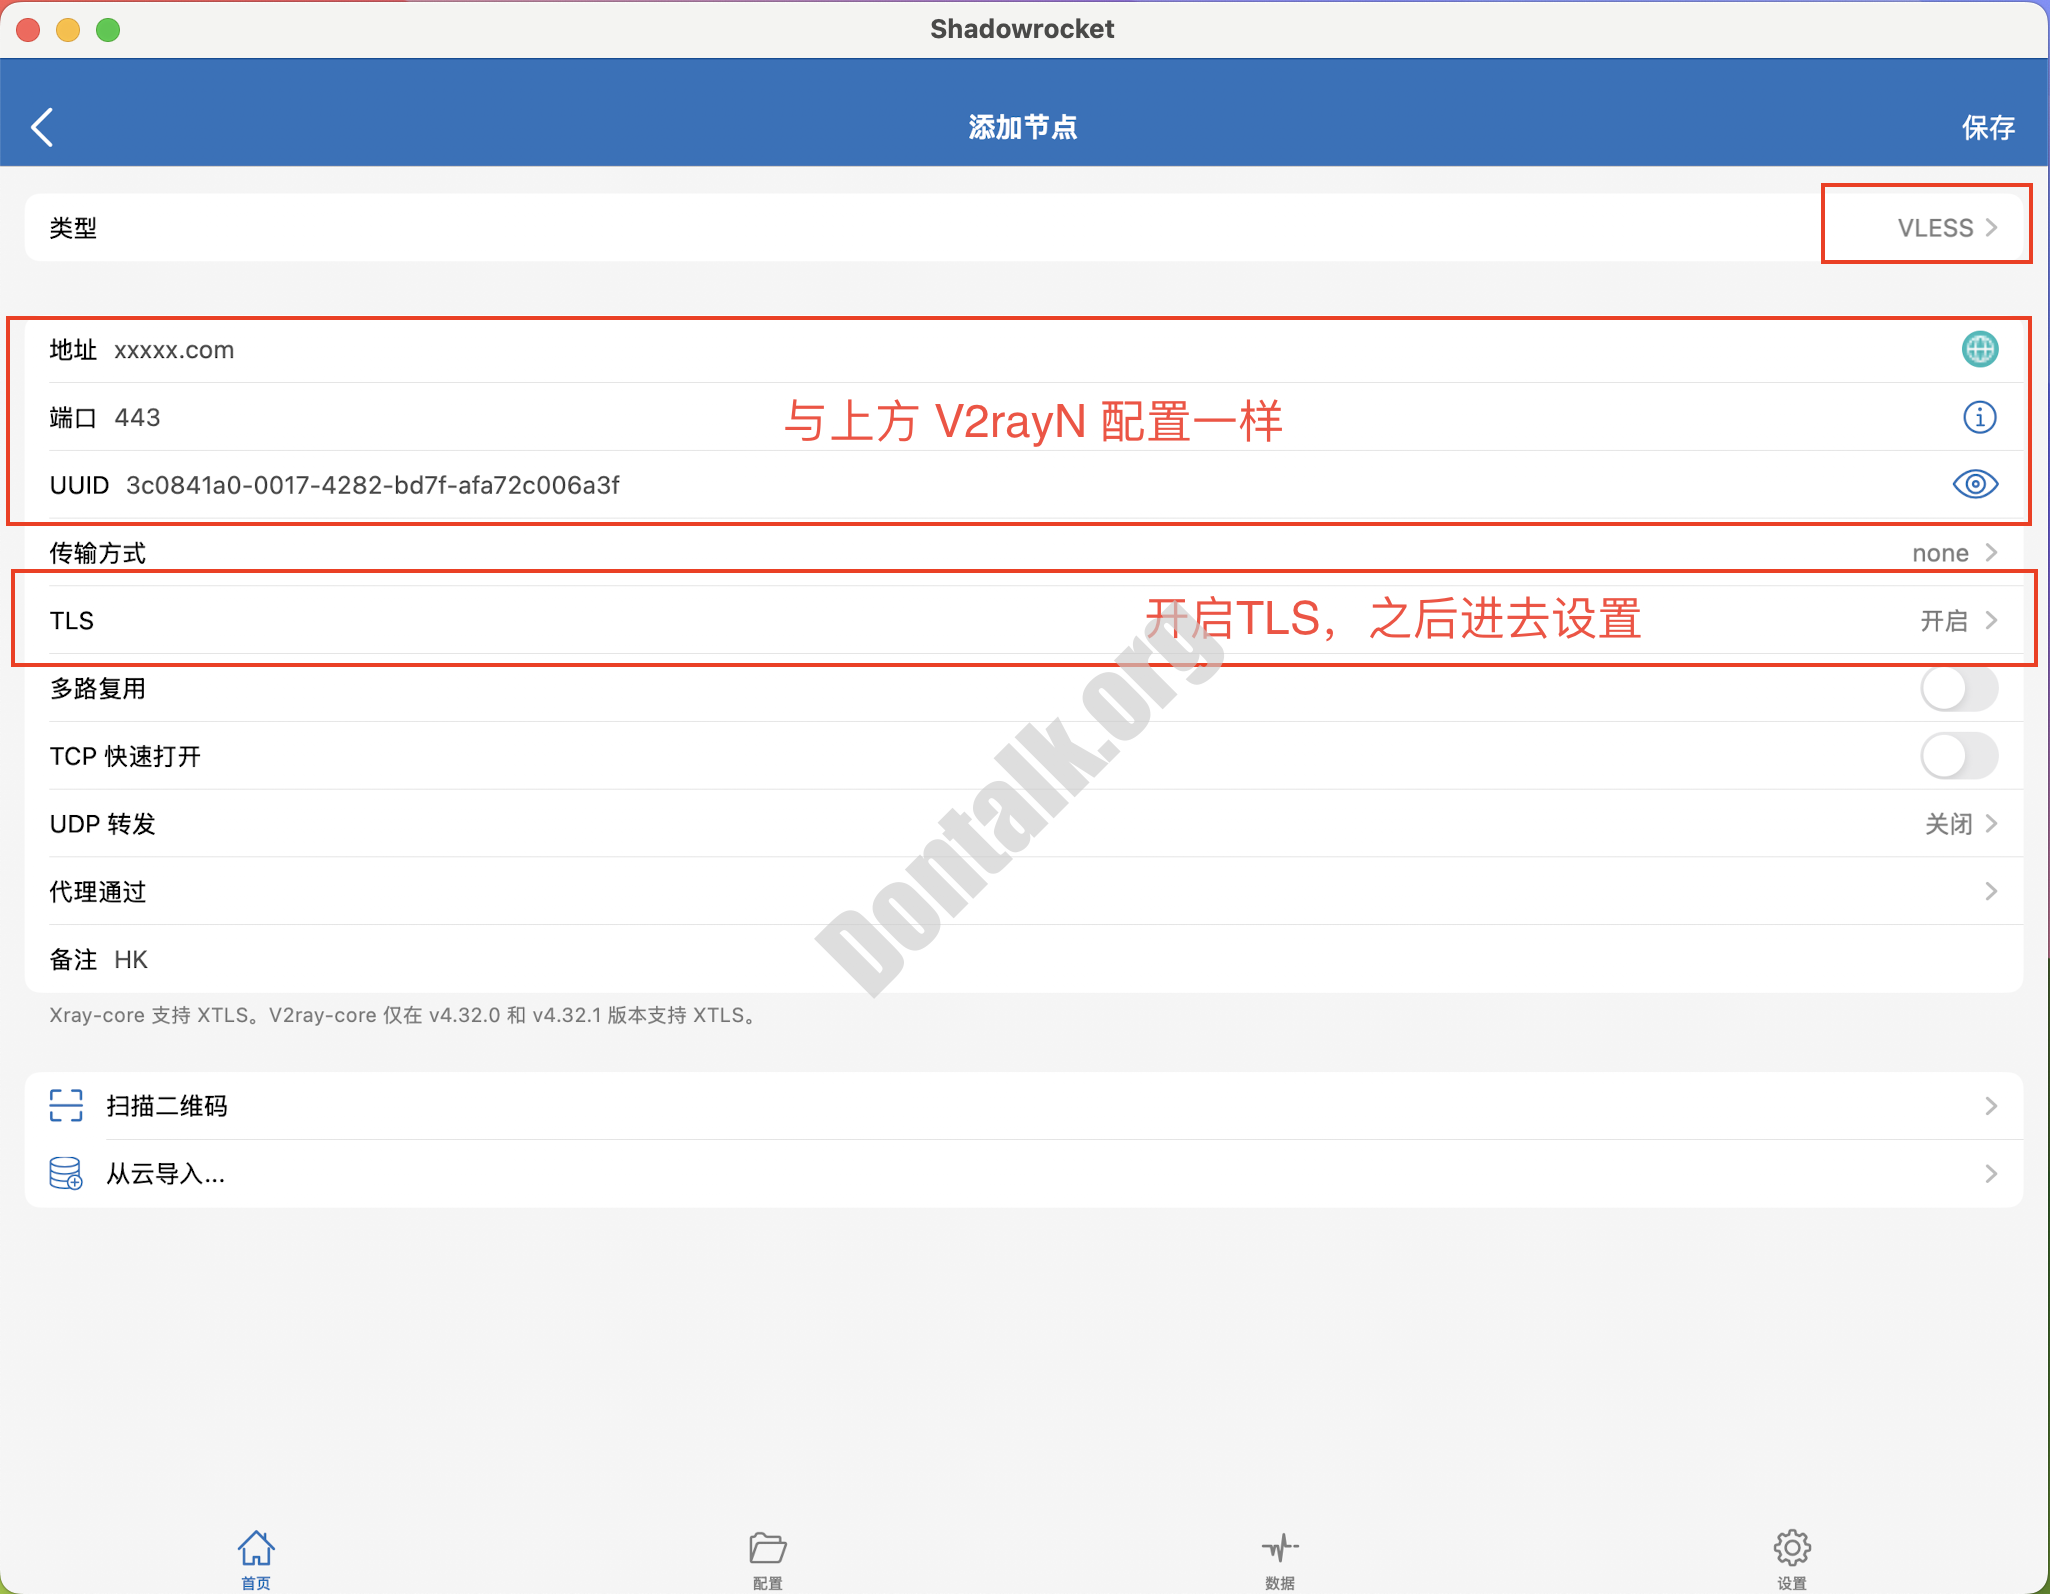
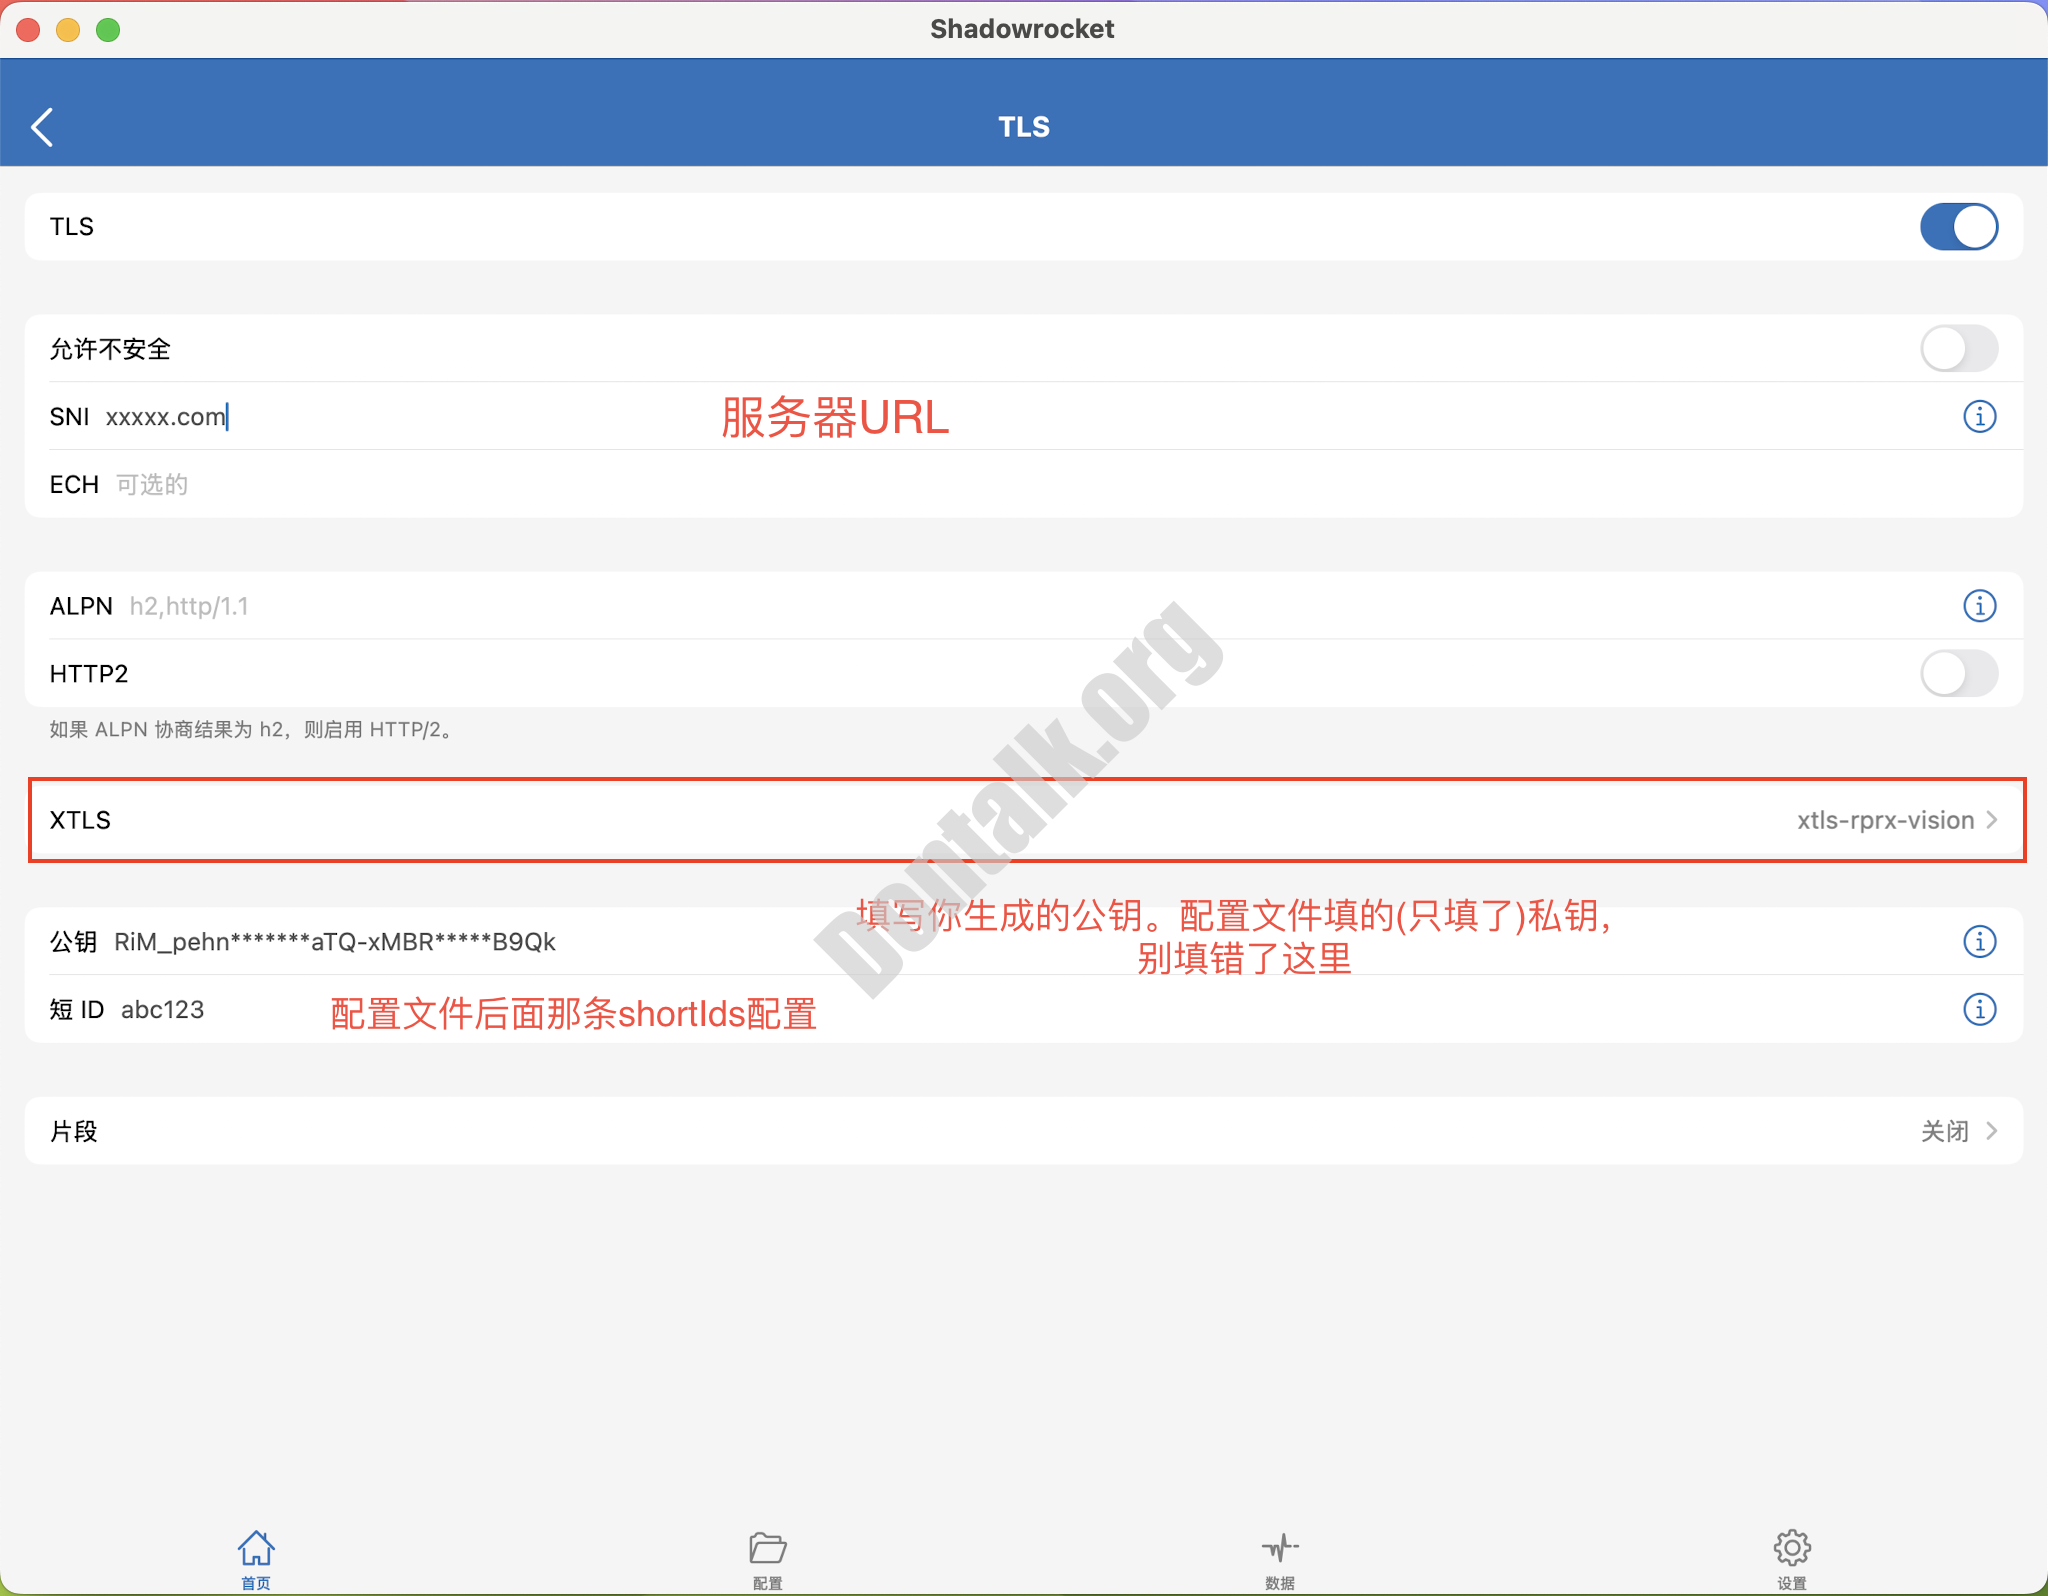
(Mac,iOS)Shadowrocket配置:
节点测试
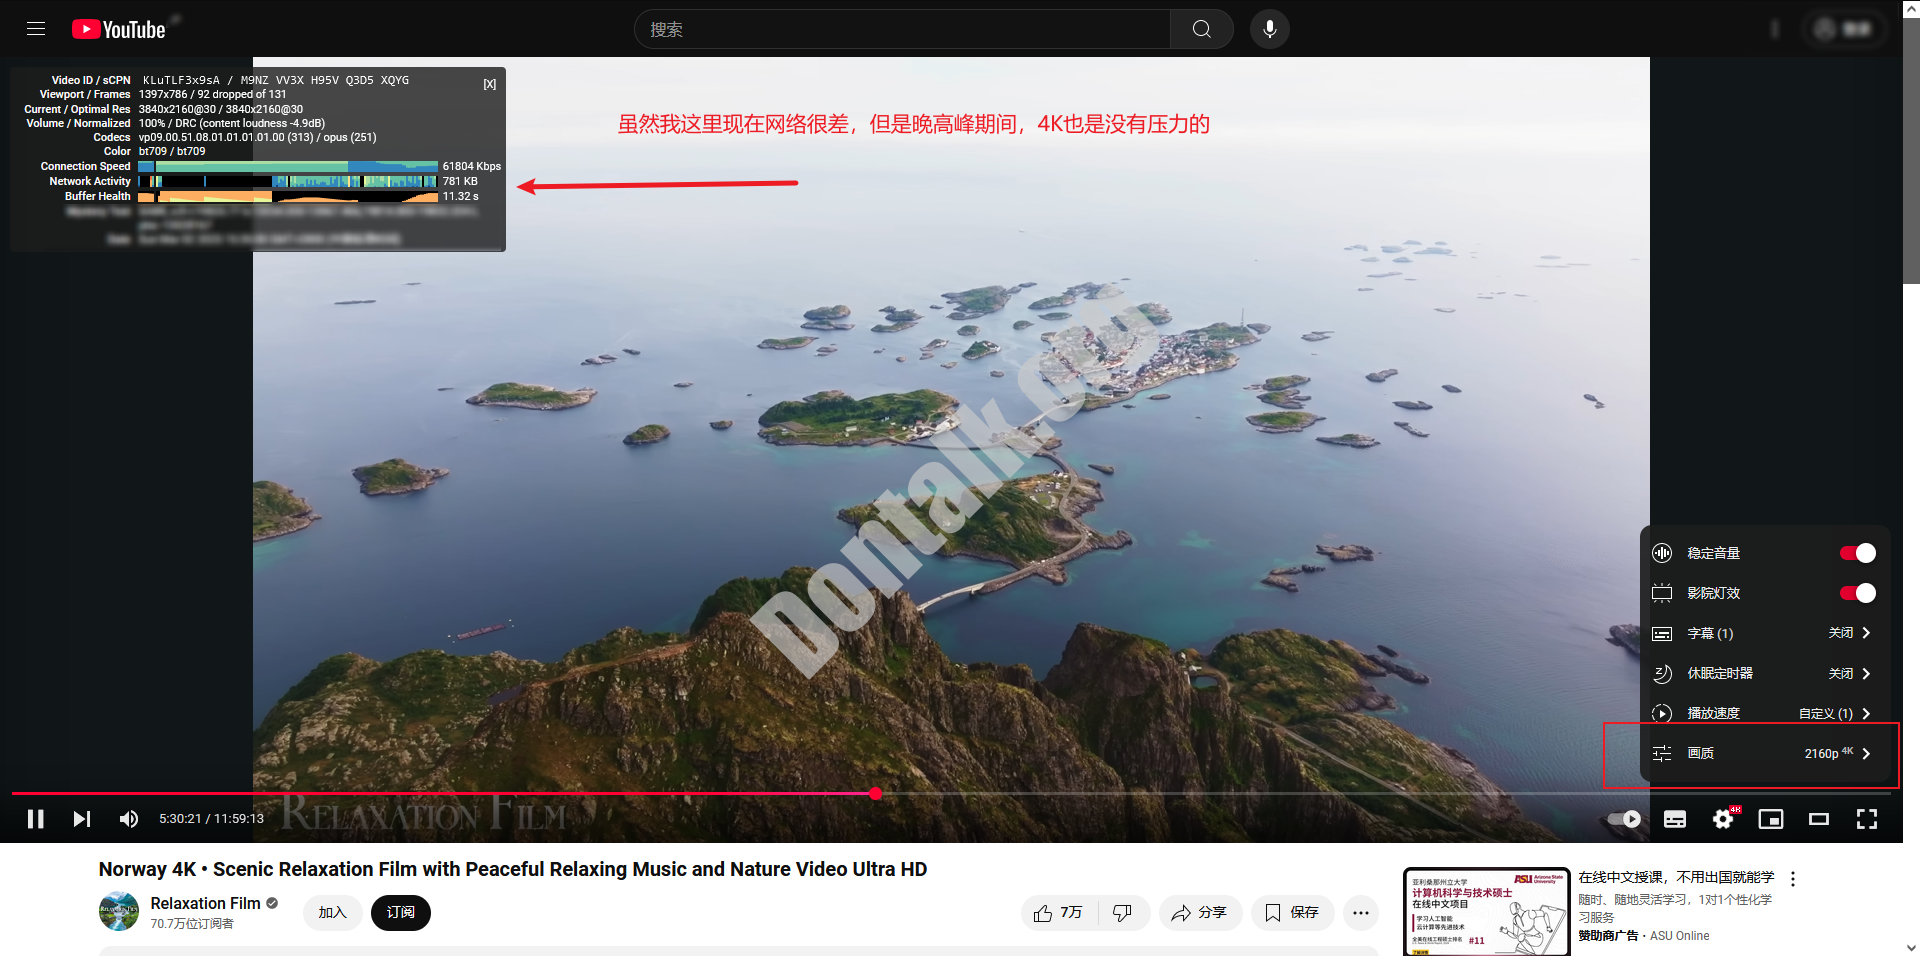
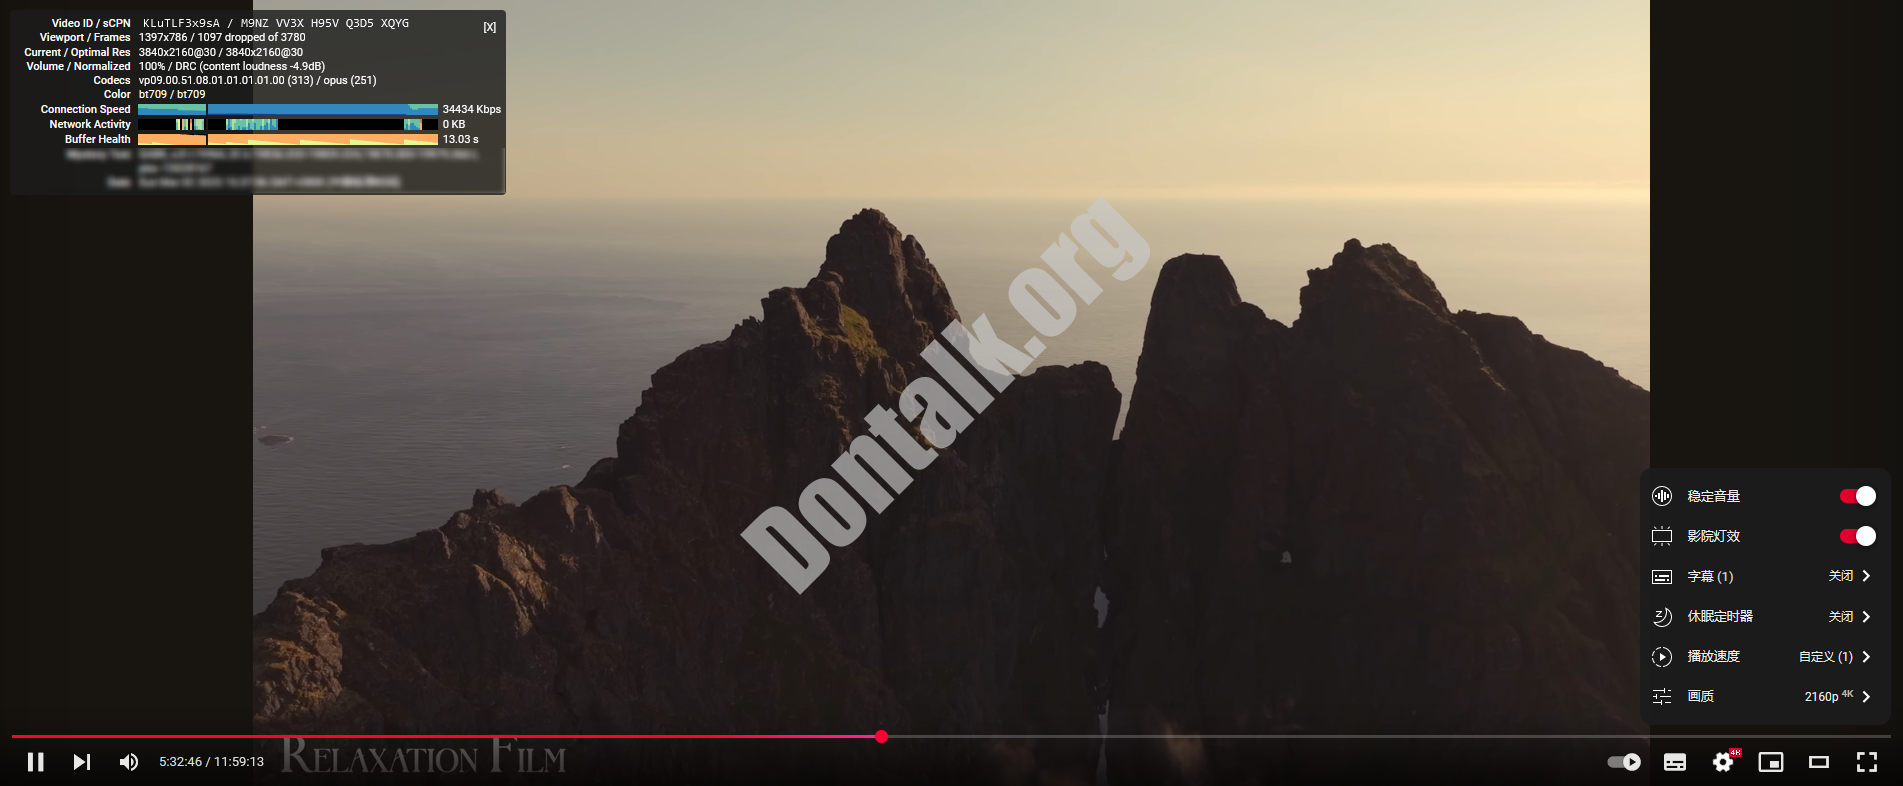
我测试过,即便是晚高峰期间,4k视频的缓冲依旧有10s左右,每一次点击,缓冲只需要1.2s左右即可完成。不过,具体还是要看你的服务器的。在服务器稳定运行半年后,才有了这个教程。直至目前,依旧没有发现服务器被任何封锁。
参考了
(Project X 小小白话文) – https://xtls.github.io/document/level-0/
(Project X 回落功能) – https://xtls.github.io/document/level-1/fallbacks-lv1.html
(阿良的幻想乡) – https://aliang-zh.top/2023/11/vless-vision-utls-reality/
发表回复